Have you ever traveled with your pup?
We did recently and my oh my...
Filling caps with water was not quenching Bentley's thirst quick enough while at a rest stop.
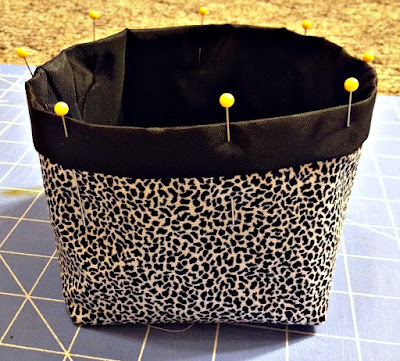
So I decided to make a travel bowl for food or water.
Materials needed:
Sewing Machine
1/4 yard of choice fabric for the outside. (Can be Duck Canvas or Cotton)*
1/4 yard of Nylon for inside (Make sure your nylon is not a loose weave)*
Matching Thread
Mark B Gone Pen
Scissors/Rotary Cutter
Pins
Pins
Ruler
Iron
(*Please note: 1/4 yard will actually make two bowls if cut properly.)
1. Start by cutting out (2) two 8 1/2 x 6 1/4" pieces of the outside fabric and (2) two 8 1/2 x 7 1/4" of the inside fabric.
2. Line your two nylon pieces together and pin. Stitch three sides of the nylon with a 1/4" seam allowance and leaving an 8 1/2" side open. Next, do the same thing with the outside fabric but with the right sides together. Make sure to back stitch your beginning and end.
3. a) Now we are going to create the bottom. The unstitched end is now your top. Cut off the tip of the bottom corner close to the stitch shown in picture one.
b) The next part can be semi-tricky for someone who has never done it and I suggest you start with the outside fabric. You are going line up the inside right seam with the inside bottom seam and then it lay flat. Measure two inches from the point you have created, draw a line, and pin to keep in place. Repeat the same instruction to the left side. Once you have created your lines, follow and sew along your line.
c) Cut off the point close to the line you have just sewn like you see in picture four.
d) Repeat steps a-b for the inside nylon.
4. After completing step three, turn your outside fabric rightside out. Fold your raw open side in towards the middle of the bowl approx. 3/4" down and press. Now for the nylon it is a little different, make sure your iron is set on the nylon setting. If you don't have a setting for Nylon, it is usually the setting right above the lowest. Keep the nylon bowl inside out. Folding the nylon is completely backwards, you are going to fold the raw open edge OUT approx. 3/4" down, Press. Do this step with the nylon two more time, pressing each time.
5. It is now time to see the bowl come to life. Place your nylon inside of the outer fabric, line up the seams and pin.
6. Sew your two pieces together towards the bottom of the black rim. And there you have it, now it is time to see if Bentley approves! (For some reason my bowl is looking a little lop-sided in the picture with squiggly thread, but I promise in person it is not! :) )
7. SCORE! He loves it! Ok, so maybe he just loves the treats inside of it but he doesn't seem to be bothered by the bowl itself!
On to the next project..
I have a really neat one coming up for Christmas time, I can't wait to share!
The poor hamsters in my head never get a break, my wheels just keep on turning :).


